Pipelines
Cirro can be used to run any of a collection of different pipelines, each of which transforms data from one or more datasets into a set of files which is saved as a new dataset. A pipeline generally corresponds to an "analysis workflow" as implemented using the Nextflow workflow management system and may also be called a "process".
A pipeline often consists of many individual steps which are executed separately, which can make the reproducibility and traceability of the resulting dataset extremely robust. All the information from an executed pipeline run is saved and available on the resulting dataset's Overview page.
To learn more about the details of running and building specific pipelines, view the Pipelines section of this documentation:
- Pipelines Overview
- Pipeline Catalog:
- Developing Pipelines
- Adding Pipelines
Running a Pipeline
After selecting a project, the Pipelines page will show a list of all the pipelines that are available to run based on the datasets that are in your project. If you do not see any pipelines available, you can click the "View all pipelines" button in the right sidebar to see a full list of the pipelines Cirro has.
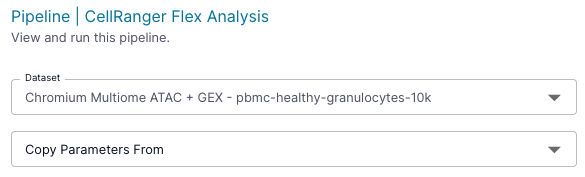
To run a pipeline on a dataset, click on the pipeline to bring up a new page with a form you can fill out with all the details needed to run. Pipelines in the Pipeline Catalog will have their documentation in-line on this page which you can use to help fill out these sections, but you can always use the documentation button at the top of the page to get more information.

If instead of selecting the input parameters, you want to import the settings used from a previous run of the pipeline, you can go to the parameter labeled "Copy settings from (optional)" and choose the previously processed dataset that you want to use the parameters from. Selecting a previous dataset will populate the entries in the pop up to match the settings used by the selected dataset and from there, you can continue to edit any of the inputs as desired.
If any component steps of the new analysis were run with the exact same inputs and parameters as the previous run, those particular analysis steps will be re-used to maximize computational efficiency.
Once you have filled out the form to your satisfaction, run the pipeline by clicking the "Run" button at the bottom of the pop up.
You will get an email once the pipeline has completed running, but you can also check progress of the run by checking the status of the dataset that is being written out by this pipeline. This can be done by going to the Datasets page, and finding the new dataset with the name you chose when running the pipeline. The status can be found in the icon next to the dataset's name or by clicking on the dataset and looking at the general information in the right sidebar. See the documentation on a dataset's status for more information.
Once the pipeline is done running, you can find the output files by selecting the new dataset and going to the dataset's Overview page.
Combining Datasets
There are many situations where it is necessary to merge together multiple datasets for a single analysis. This may be when a single batch of samples is split across multiple sequencing runs, or when multiple batches of samples need to be aggregated for a single analysis.
Examples
Consult the Cirro pipeline catalog to see if your pipeline supports multiple datasets. Some examples include:
- Germline or Somatic DNA Variant Calling (nf-core/sarek)
- GATK Whole Genome Germline Variant Calling (broadinstitute/warp)
- RNAseq Gene Expression Analysis (nf-core/rnaseq)
- Microbiome Taxonomic Classification (MetaPhlAn4)
Selecting Multiple Inputs
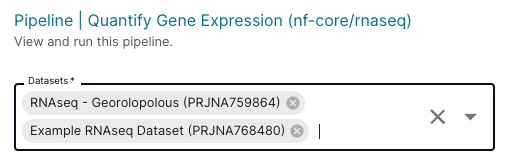
When an analysis supports multiple inputs, the Cirro interface will allow you to select any number of datasets using the menu at the top of the page:
How it Works
When an analysis has been run with multiple inputs, Cirro will link the analysis to all of the input datasets, and will allow you to navigate to the input datasets from the analysis.
When multiple input datasets contain files from the same sample, the data from those files will be combined together into a single analysis. The complete set of samples from all input datasets will be used for the analysis.
In cases where an analysis pipeline supports selecting a subset of the input datasets, a menu will be provided to allow you to select which specific files to include in the analysis.
For more questions about this functionality, or for support with a specific analysis, contact the Cirro team.
Adding a Pipeline
Custom pipelines can be added to projects by Project Admins which are then available to all members of that project.

For more information on adding existing pipelines to Cirro, read our documentation on adding custom pipelines. To read a discussion on the best-practices for developing new pipelines, see the pipeline development documentation.
Pipeline References
When running pipelines in Cirro, you may need extra references alongside your input dataset and parameters. These references can be things like metadata, "normal" samples, or any other additional data files needed for a pipeline to run. To see all the references that are available in a project, click the "Manage References" button on the Pipelines page.

Users can upload references to a project which are then available to be used by any dataset in that project. See the Adding a Reference section below for details. Cirro also provides some commonly used references for all projects by default. These "public" references are a collection of compiled genome indexes including iGenome and CellRanger.
To get information on the references needed for a specific pipeline, go to that pipeline's documentation in the Pipeline Catalog.
Viewing References
The References page contains a table of all the reference files that users have uploaded to the project. You can click on any of these references to download or delete them, depending on your permissions. You can change the sorting and add/remove columns using the three dots in the table header  , and also filter the references using the sidebar on the right side of the page.
Publicly available references are found directly in the drop down options when you select a pipeline to run. You can also find information about which references will be available in your pipeline's documentation in the Pipeline Catalog.
Adding a Reference
When adding a private reference to a project, note that every reference belongs to a specific reference type and must meet any requirements for that type. For example, this could mean requiring a CSV or TXT file. The uploaded files are checked against the reference type's requirements in Cirro's system based on folder and file name patterns. You will need to meet all requirements before a reference can be uploaded. See below for a full list of reference types.
To add a new reference to a project, go to the References page under the project you want to add to, and click the "Add Reference" button at the top right of the page. You will get a pop up with a form to fill out for your new reference. The form entries are:

- Reference Type: Choose from the drop down to select the corresponding type for your new reference. This will limit what kind of file you can upload. Check the bottom of the pop up (above the "Save" button) for information on what file types are required.
- Name: A unique name for the reference
You can drag and drop the files or click to select the files in a file manager window. Confirm that all the required file types are present before clicking save.
Downloading or Deleting a Reference
To download or delete a reference, click on the reference in question on the References page. Then select either the "Download" or "Delete" button on the pop up.
Reference Types
All references must be of a specific reference type, which defines what types of files can be uploaded. Below is a table of all available reference types.
| Name | Description | Expected File Type(s) |
|---|---|---|
| Barcode files (general) | List of line-separated barcodes | *txt |
| CellRanger Feature Reference (CSV) | Reference file used for Feature Barcodes on the 10X platform (e.g. Antibody Capture, CRISPR Guide Capture) | *csv |
| CellRanger Probe Set (CSV) | Probe Set Reference CSV used by the CellRanger analysis software | *csv |
| CRISPR sgRNA Library | Describes the set of sgRNA guides used in the screen, along with the genes which each guide targets. | *csv |
| Genome Regions (BED) | Table of genomic regions in BED format | *bed |
| Genome Regions (Interval List) | Table of genomic regions in interval_list format | *interval_list |
| Genome Ploidy (Contig Ploidy Priors) | The contig ploidy priors table is a file that is required for the DetermineGermlineContigPloidy step in the GATK pipeline | *.txt |
| Proteomics Experimental Design | SDRF or OpenMS-style TSV | *tsv |
| Reference Genome (BWA) | Genome sequence indexed for alignment with the BWA algorithm. | *a.gz, *a.gz.amb, *a.gz.ann, *a.gz.bwt, *a.gz.pac, *a.gz.sa |
| Reference Genome (FASTA) | Genome fasta file | *.f* |
| Reference Genome - GATK (FASTA) | Genome reference with .fai and .dict as expected by GATK | *fasta, *fai, *dict |
| Reference Genome Features (GTF) | Genome annotations in GTF format | *.gtf |
| Spreadsheet (CSV) | Tabular spreadsheet in CSV file format | *csv |
| Spreadsheet (XLSX) | Tabular spreadsheet in Excel (XLSX) file format | *xlsx |
| VirScan Library | VirScan library CSV (oligo, Strain, Protein, Prot_Start, Prot) and Table of public epitopes (peptide_translate). | *lib*.csv, *pub*.csv |