Notebook Workspaces
A notebook workspace is a place to run and save Jupyter Notebooks and their outputs. Jupyter Notebooks are a great way to run extra analysis on one or more datasets in your project. You can create a notebook, easily import your datasets without downloading the files locally, and interact with the data using the Cirro's interface for Python and/or R. The other users in your project can then access the notebooks and edit or re-run them for reproducibility and easy collaboration.
Create a Notebook Workspace
To add a new notebook workspace for a project, go to the Notebooks page under the project you want to add to, and click the "Create Workspace" button at the top of the page.

You will get a pop up with a form to fill out for your new notebook. The form entries are:
- Name: A unique name for your notebook workspace
- Computer Type: Choose the type of computer instance you want to use. The options are General Purpose (this should be enough for most users), Memory Optimized, Compute Optimized, and GPU Accelerated. These options map to AWS EC2 instances, which you can read more about in the Amazon SageMaker Studio documentation.
- Computer Specifications: The particulars of the computer instance you want to use. The options are listed as a table with columns (from left to right) of cost per hour (as of the date in the pop up), the number of CPUs/processors, and the amount of memory in gibibytes. The cost for computation is separate from the cost for storage (see below). For some of the Computer Types, there will be recommended Computer Specifications which are set up to load quickly (in less than 2 minutes).
- Storage: The size of the processor you want to use in gigabytes. The price for storage is $0.14 per GB per month (as of January 2023) and is separate from the cost for computation.
Finding a Workspace
The notebooks workspaces are organized in a table and by default are sorted by the date it was last updated. You can change the sorting and add/remove columns using the three dots in the table header  , and also filter the workspaces using the sidebar on the right side of the page.
Using Workspaces
To launch a notebook workspace, click on the workspace on the Notebooks page and then click the "Open Workspace" button in the pop up. The workspace should launch automatically in a new tab, but if this doesn't happen you can click the link in the pop up.
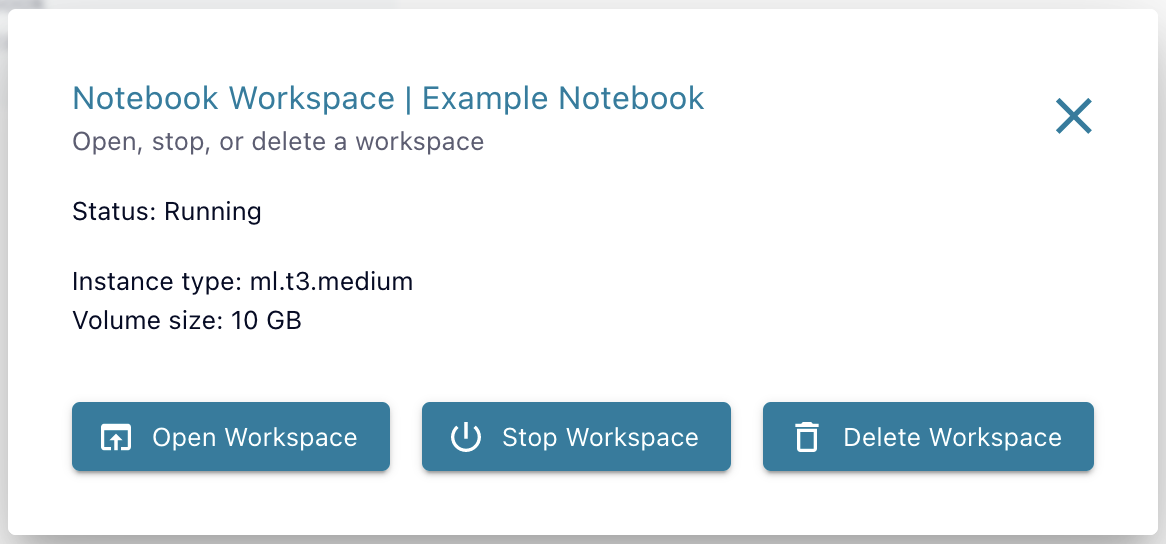
When you are done using a workspace, you will need to be sure to explicitly shut down the workspace in order to stop incurring costs. To do this, select the workspace you want to shut and click the "Stop Workspace" button in the pop up. This button will only be available when the workspace is already running.
To delete a workspace, select the workspace and click the "Delete Workspace" button in the pop up.
Using Notebooks
When you launch a notebook workspace, you will find a folder structure that houses all the notebooks saved in this workspace. If you write out any files or images as part of your notebook analysis, you will also find those files here.

To create a notebook, click the button that says "New" in the top right corner of the page and select the kernel you want to use. This is where you can choose the programming language (e.g. Python or R) and any specialty packages you want installed (e.g. TensorFlow or PyTorch). You will have the option to change the kernel after you've created the notebook. After selecting a kernel, the blank notebook will be launched. To run an existing notebook, you can click on the notebook's name to launch it.
If you are new to Jupyter notebooks, you can check out Jupyter's documentation on the basics of how to use them. You can use Python to run extra analysis pipelines and read datasets into tables which can be viewed and plotted however you'd like. To see some examples of interacting with datasets in notebooks, check out the Python example notebooks. Or if you are more comfortable using R, check out the R example notebooks.
Remember to go to the top of the page and click where it says "Untitled" to re-name the notebook, and save it either under the File tab or by using the normal keyboard shortcuts for your machine.

To shutdown a notebook, in the "Files" tab you can select the notebook by clicking the checkbox next to its name and then clicking the brown button that says "Shutdown". If a notebook is currently running, it will have a green icon next to its name. Once it is shut down, the icon will turn black. You can also go to the "Running" tab and click the brown "Shutdown" button next to the file's name.

Organizing a Workspace
To create new folders in a workspace, click the button that says "New" in the top right corner of the page and select "Folder" at the bottom. Then click the empty box next to the Untitled Folder and click the Rename button.
To move folders or files around, click the empty box next to the item you want to move, and then click the Move button that appears

Pricing
Pricing for the notebooks charges by the hour for the time when the notebook workspaces are open and running. This means the time from when the notebook workspaces are opened until they are shut down. To shut down a workspace, select the workspace you want to shut and click the "Stop Workspace" button in the pop up.