Datasets
Datasets are groups of one or more files that live inside a project. They could be a collection of FASTQ files or images generated by a microscope. A new dataset can be created by (a) uploading files through the browser, the command line, or via Python, or (b) running a pipeline on an existing dataset that outputs files to a new dataset. Any user with contributor access or higher may add a new dataset to a project via either of these methods.
However they are created, datasets are connected to their project and datasets cannot be accessed outside of that project. Therefore, their permissions and the costs incurred by them can all be controlled through the project's users and billing.
Adding a Dataset through Cirro
To add a new dataset to a project through the Cirro browser, select the project you want to add data to and then go to the Datasets page via the navigation bar on the left. At the top of the Datasets page, click either the "Private Dataset" button to upload files from your local machine, or the "Public Dataset" button to download a publicly available dataset from online.

Once you click one, you will get a pop up with a form to fill out for your new dataset. See below for details on these forms.
After you've submitted your dataset, make sure to wait for all files to complete uploading through the browser. Once this is completed, you will be redirected back to the datasets page where your newly added dataset should be immediately visible.
Adding Local Private Data
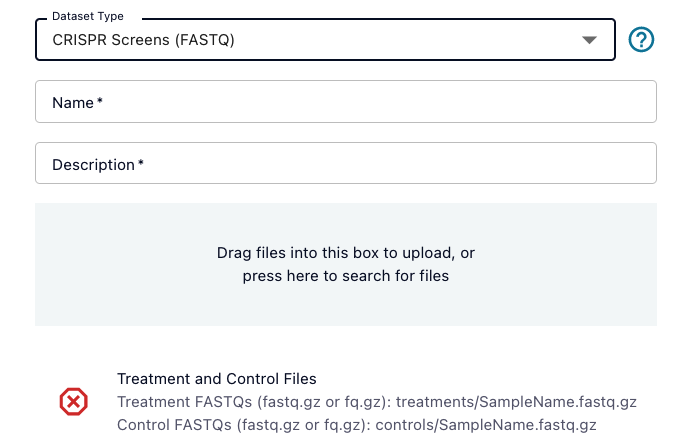
If you select uploading private data, you will get a pop up with the following entries:
- Dataset Type: The type of data you are adding, which will be used to check that the files added meet certain requirements and determine what types of analysis you will be able to run. Click the
 icon to go to the relevant documentation.
 - Name: Choose a unique name for your dataset.
- Description: A 1-2 sentence description of your data.
If there are required files for the dataset type you selected, you will see a list of those files at the bottom of the pop up window. The file requirements will include an overall description of the file(s) required, and then below that a list of example file types that are allowed. For example, for Paired DNAseq, you must upload a set of paired FASTQ files, but those FASTQ file names can be formatted any of three different ways:
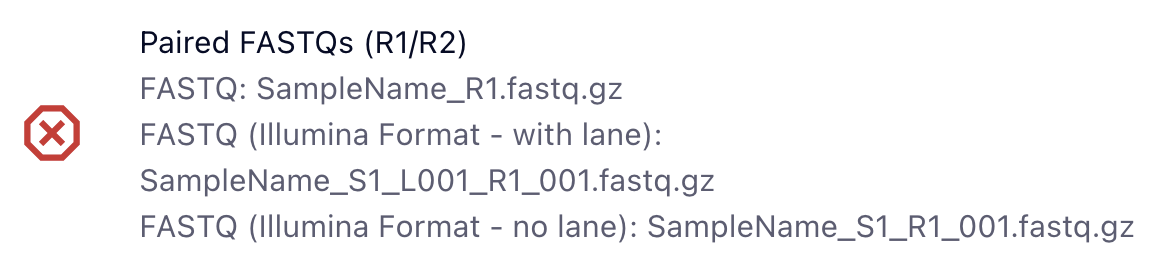
You can hover over the red X to get more information on things like the number of files required. You can always add files beyond the required list, but you must meet the dataset type requirements before submitting.
To upload the files, you can either drag and drop your files into the pop up, or click the green box to open a window and navigate to the files you want to add. Once you are done adding files, be sure that all the red X's have been changed to green check marks to confirm that all the required files have been added before submitting the dataset. You will only be able to click the "Submit" button once the requirements have been met.
Adding Publicly Available Data
If you select downloading public data, you will get a pop up with the following entries:
- Dataset Type: The type of data you are adding, which will be used to check that the files added are of the correct type, and to determine what types of analysis you will be able to run.
- Name: Choose a unique name for your dataset
- Description: A 1-2 sentence description of your data
- IDs: The SRA, ENA, or GEO ID for the dataset you want to download. Cirro will recognize the formatting of the ID and use that to query the correct website.
Other Upload Options
Besides using the Cirro browser, you can also upload data using the command-line interface or a Python session. See the Command Line and Python Interface section of the documentation for information on how to use those features.
When uploading data, file sizes over 100MB are less practical for transit through the browser, and should ideally be uploaded from the command line or a Python session.
If you are working with large datasets that are generated by core facilities, you may wish to consider coordinating with them such that they can ingest the datasets directly from that location, rather than move the files multiple times.
Uploading Metadata
When uploading a dataset, you may want to include metadata on the files via a sample sheet named samplesheet.csv. Metadata can be added without sample sheet, but it may require more work to manually enter the information. See the documentation on samples for more details on your options.
Finding a Dataset
Datasets are organized in a table and by default are sorted by the date created. You can change the sorting and add/remove columns using the three dots in the table header  , and also group or filter the datasets using the sidebar on the right side of the page.
When filtering the data, you can search the text of a dataset's name, description, and any tags; add a date range; or select from available options for the dataset's the user who created it, its type, status, and/or its tags.
Dataset Status
Each dataset has a status that can be viewed either in the table on the Datasets page or on the right sidebar of the dataset's Overview page. In the table view, the status will be represented by an icon. There are four options for the status of a dataset:
 Status: Pending: When a pipeline has been triggered, but has not started running yet. This can take up to 10 minutes depending on server availability. If the status is "pending" for a dataset that was uploaded, consider deleting and re-uploading the data.
 Status: Running: When a pipeline is currently running.
 Status: Completed: Either when the dataset has been successfully uploaded or successfully created from a pipeline run. This status means the data is fully available and ready to be used.
  Status: Error: When there was a problem in the pipeline run. This status means the data is not available for use. View the detailed logs on the dataset's Overview page to see where the problem was in the pipeline.
Dataset Types
All datasets have a "type", which sets requirements on what kinds of files the dataset must contain and what pipelines may be run on it. For example, an RNAseq-type dataset must contain paired-end FASTQ files and can be used to run analyses for bulk gene expression, etc.
For datasets that have been created by running other datasets through a pipeline, the pipeline will define the output dataset's type for you.
On the other hand, when uploading a dataset, you must select a type for your new dataset and Cirro will confirm that the expected files are present for your dataset's type. The files are checked against a set of file name patterns that are required for the dataset type.
When you upload a dataset, if you're in the browser you'll be able to see these file name requirements printed out in the pop up window. If you are uploading via the command line or a Python session there will be a check and if your files do not fulfill the file naming patterns, you will get an error that contains example name patterns that are accepted.
The file name patterns come from common sequencer outputs, but if you have re-named files such that they no longer conform to these patterns, you can still upload your files under your specified dataset type if you also upload a valid samplesheet.csv file.
Since these dataset types are used to confirm you have the proper files to run analysis pipelines, if you do not plan to run any pipelines on your data and just want a place to store and share files, consider selecting the "Files" data type, which allows any kind of file.
Full List of Ingest Dataset Types
| Name | Description | File Name Requirements |
|---|---|---|
| 10X Single-cell (FASTQ) | FASTQ files generated from the 10X single-cell sequencing platform | *_S*_L???_{I,R}{1,2}_001.fastq.gz |
| CODEX Images (processed) | Processed image data produced by the CODEX platform (qpTIFF) | *.qptiff or *.tif and channelNames.txt |
| CODEX Images (raw) | Unprocessed image data produced by the CODEX platform (TIFF) | *.tiff |
| CRISPR Screens (FASTQ) | FASTQ files generated from sequencing CRISPR sgRNA libraries | treatments/*.{fastq,fq}.gz or controls/*.{fastq,fq}.gz |
| CellRanger analysis output | Processed data analyzed by CellRanger | None |
| CosMx Single-Cell Imaging | Spatial transcriptomics data produced by the NanoString CosMx platform | None |
| Curated Metagenomic Data | Data tables produced by the curatedMetagenomicData project | Any profile data file |
| Differential Expression Results (CSV) | Tabular data summarizing differential expression analysis results | .*csv |
| Files | Any collection of files provided by the user | None |
| Flow Cytometry (FCS) | Measurement of cell surface markers by fluorescent tags | *.fcs |
| Genomic Variants (VCF) | Detailed summary of genomic variants in VCF format | *.vcf.gz |
| Human Cell Atlas Dataset | A Dataset Downloaded From the Human Cell Atlas | None |
| Illumina Sequencing Run | Illumina sequencing run output (raw BCLs) | None |
| Images | Any collection of image files | None |
| Long Read Sequencing (FASTQ) | FASTQ files generated from PacBio or Oxford Nanopore Sequencing | *.hifi_reads.fastq.gz, *.fastq.gz |
| MADDD-seq (FASTQ) | FASTQ files generated from duplex genomes sequencing | *.fastq.gz |
| Microbial Genome (FASTA) | Nucleotide sequence of a single microbial genome | *.{fasta | fsa | fna | fa}.gz |
| Microbial Proteins (FASTA) | Amino acid sequence of one or more microbial genes genome | *.{fastp | faa | fnp | fa}.gz |
| MuData Multimodal Dataset | Multimodal dataset produced by the MuData project | .h5mu |
| Nanostring nCounter (RCC) | Summary of gene expression quantified by the Nanostring nCounter platform | *.RCC |
| NCBI Genome Table (TSV/CSV) | Tabular summary of genomes available in the NCBI Genome Portal | *.tsv or *.csv |
| Nextstrain Build (FASTA + TSV) | Viral genome sequences and annotations compatible with Nextstrain builds | *.{fasta | fsa | fna | fa}.gz and *.tsv |
| Nucleotide Sequences (FASTA) | Genomic sequence(s) in nucleotide FASTA format | *.{fasta | fsa | fna | fa}.gz |
| PacBio HiFi (FASTQ) | FASTQ files generated from the PacBio long-read sequencing platform | *.{fastq,fq}{.gz,} |
| Paired 16S (FASTQ) | FASTQ files generated from paired-end sequencing of 16S amplicons | *{.,_}{R,}{1,2}.{fastq,fq}{.gz,} or *_S*._L???_R{1,2}_001.fastq.gz |
| Paired DNAseq (FASTQ) | FASTQ files generated from paired-end sequencing of DNA libraries | {.,_}{R,}{1,2}.{fastq,fq}{.gz,} or *_S*._L???_R{1,2}_001.fastq.gz |
| Paired RNAseq (FASTQ) | FASTQ files generated from paired-end sequencing of RNA libraries | .*(\\. | _)(R | )(1 | 2)\\.(fq | fastq)(\\.gz | ) or .*_S.*_L..._R(1 | 2)_....fastq.gz |
| Proteome Discoverer Results | Analysis files produced using the Thermo Scientific Proteome Discoverer software | [\\S ]*.pd* |
| Proteomics (Thermo Scientific RAW) | Identification of protein fragments by mass spectrometry on the Thermo Scientific Orbitrap platform | *.raw and *.tsv |
| Proteomics (mzML) | Identification of protein fragments by mass spectrometry (mzML format) | *.mzML and *.tsv |
| Relative Abundance Table (CSV) | Tabular file summarizing relative abundance data | *.csv* |
| Single-Cell Dataset (Loom, Anndata, or Seurat) | Single-cell datasets saved in Loom (.loom), Anndata (.h5ad), or Seurat (.h5seurat) formats | *.loom or *.h5ad or *.h5seurat |
| Spatial Transcriptomics (Xenium) | Spatial transcriptomics analysis results from the 10X Xenium platform | cell_feature_matrix.h5, cells.zarr.zip, analysis.zarr.zip, transcripts.zarr.zip, morphology.ome.tif |
| TCRseq / BCRseq (Paired FASTQ) | FASTQ files generated from sequencing of TCR/BCR loci | .*(\\. | _)(R | )(1 | 2)\\.(fq | fastq)(\\.gz | ) or .*_S.*_L..._R(1 | 2)_....fastq.gz |
| Unaligned BAM | Genomic sequences in unaligned BAM format | *.bam |
| VirScan (FASTQ) | FASTQ files generated from VirScan analysis of peptide binding | *_*.{R1,R2}.fastq.gz or *_*_S*_{R1,R2}_00*.fastq.gz |
| Visium Spatial Transcriptomics | Spatial transcriptomics analysis results from the 10X Visium platform | None |
Dataset Overview Page
When you click on a dataset, you are taken to an overview page which contains all the basic information on the selected dataset. s
Editing or Deleting a Dataset
At the top of the page, you will see various buttons that you can use to interact with the dataset. If you do not have permission to perform an operation, the button will not be available.

With the "Edit Dataset" button, you have the option to update the dataset's name and description. You can also update the ingest dataset type if you have not already used the dataset as an input while creating a different dataset. If the dataset was created by ingesting data (not created through a pipeline), you can also update the dataset's samplesheet.csv file via the "Upload Samplesheet" button.
If you delete a dataset accidentally and you are within the dataset retention time period that was chosen for your project (7 days unless changed by the project administrator), contact the Cirro team for help getting your dataset back.
Downloading a Dataset through Cirro
To download individual files through Cirro browser, navigate through the folder structure of the dataset until you find the file you are looking for, click on the file name and choose "Download".
To download an entire dataset, use the "Download All" button at the top of the dataset's page and either download a zip file or choose "CLI Instructions" to get commands you can use in the command line. If the dataset is too large to download via the website (greater than 100 GB), you will get a warning to use the command line. Downloading via the browser will also time out after an hour.
Lean more about downloading datasets from Cirro using the command line, Python, or R.
Dataset Tags
Datasets can have tags attached to them that make them easier to organize and search for. To add a tag to a dataset, click the "Edit Tags" button at the top of the dataset's Overview page. This will open a pop up where you can type in new tags and remove existing tags.
A project's tags are visible on the right side of the dataset's page and in the Edit Tags pop up.
Dataset Viewers
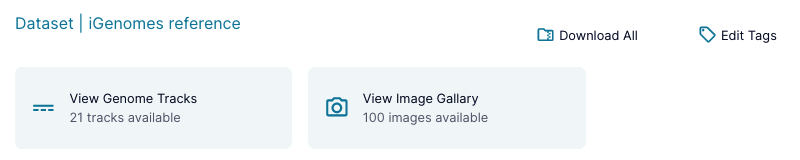
Certain datasets with well defined types may have viewers available on their Overview pages in order to provide a quick-look view of the data. These viewers will be available at the top of the dataset's Overview page as shown below.
Dataset viewers can be things like image galleries, genome track viewers, or sets of plots from a pipeline output, and will continue to be expanded in the future.
Dataset Files
On the left side of the page you can find a list of all the files in your current dataset. Depending on the dataset you selected, this may be data you ingested or data that was created by a pipeline run.
To find files, click through the folders or use the Filter search bar on the top right of the page to recursively search your files. You can search by a full or partial file name, or by the file type (e.g. html, tsv, etc).
Once you have found the file you want to download, click file name or the download icon  next to the file name to download it. Or you can use one of the other methods for downloading files.
Dataset Information
The right sidebar of the page contains overview information about the dataset.
At the top is information on the dataset's status the dataset's type, the user that created it, and the time it was created. Below that is a list of any tags for the dataset.
This is followed by a "Generation" section with information on how the dataset was created. If a dataset was created by ingesting it directly into Cirro, the following information will be available:
- Pipeline Documentation: A link to the documentation for the pipelines related to the dataset's type
- More Info: A pop up containing:
- Ingest Manifest: Links to the manifest file that was created when the data files were uploaded to Cirro, and includes information like the user who uploaded the files and the file names.
If a dataset was created from a pipeline, the following information will be available:
- Dataset Names: Links to the dataset(s) that were input into the pipeline used to create this dataset
- Pipeline Documentation: A link to the documentation for the pipeline
- Input Parameters: A pop up with the input parameters for the pipeline including the files used and any other selections made when the pipeline was run
- Execution Logs: The log outputs from the pipeline
- More Info: A pop up containing:
- Workflow Report: Links to the Nextflow execution workflow report which shows useful metrics about the workflow. This includes things like an execution summary, the resource usage, and a detailed list of all the executed tasks. To learn more about the specifics of this report, see the Nextflow documentation on execution reports.
- Workflow Execution Graph: Links to an image of a directed acyclic graph showing the flow of the pipeline. This graph is generated as the pipeline runs and shows the process of steps the pipeline took to generate this dataset based on the input parameters. See the Nextflow documentation on DAG Visualization for more details.
- Trace Report: Links to the Nextflow trace report which shows useful information for each process executed in the pipeline script. This includes things like timing, CPU, and memory. To learn more about the specifics of this report, see the Nextflow documentation on trace reports.
- Compute Config: Links to the processes and machines that were used to run the pipeline. These are assigned automatically and cannot be changed by the user. To read more about this, see the Nextflow documentation on compute configuration. This section is only visible for users with administrator privilege for the project.
- Pipeline Config: Links to the full configuration file that was passed into the pipeline. While the execution file includes what was specified by the user who ran the pipeline, the pipeline config also includes extra parameters that were automatically set by Cirro. The pipeline config may also include some parameters that the user specified but had to be re-formatted in order to be passed into the pipeline.
- Samplesheet: Links to the input sample sheet if one is present.
- Files: Links to the input files used when creating this dataset.
Then there is the "Run Analysis" section, which has a list of links ot pipelines that can be run using this dataset.
Following this is the "Analysis Results" section which has links to datasets that were created using this dataset as an input. If no datasets have been created off of this one, this section will not be present.