Importing Custom Pipelines
Once you have a pipeline ready, you can import it into Cirro.
Prerequisites
Keep in mind the following prerequisites and steps to successfully import a custom pipeline:
-
You must have the Pipeline Developer role in Cirro.
To request developer permissions, please contact your organizational administrator or email your organization's Cirro contact.
-
You must have the Contributor or Admin role for any projects you'd like to access the pipeline.
The pipeline is only visible within those Cirro projects which are specified by the pipeline author.
-
You must have a repository on GitHub that contains the pipeline code and configuration files.
The user who imports a particular pipeline into Cirro is referred to as its 'author' (even if they did not write the actual workflow code).
Viewing Custom Pipelines
To access the list of custom pipelines that are available to you, and to add new pipelines, navigate to the Pipelines page and click on "Custom Pipelines".

The Custom Pipelines page displays the table of your pipelines. Details about the pipeline can be viewed by selecting the pipeline from the table.
Adding a Custom Pipeline
Click on the "Add Pipeline" button to open a new page and fill out the following information to add a custom pipeline.

- Process Type: The type of process you want to add. There are three options:
- Ingest: A process that runs when new data is ingested into Cirro. This process type is used to define dataset types that can be used as inputs for other processes.
- Nextflow: A process that runs a pipeline using Nextflow.
- Cromwell: A process that runs a pipeline using Cromwell (WDL).
- Name: The name of the process, which is visible to the user.
- Process ID: The unique ID of the process. This field is auto-generated from the name, but can be edited. This cannot be changed once the process is created.
- Description: The description of the process, which is visible to the user.
- Data Type: (Optional) The type of data this pipeline will output. This is only used as helper text for the output dataset to provide clarity for users. If omitted, users will just see the name of the pipeline. (Example: Aligned Reads)
- Documentation URL: (Optional) A link to the documentation of the process. This could be an external website, a public repository's README, etc.
- Category: (Optional) Select which group the process belongs to. (Example: Microbial Analysis)
- Input Processes: (Optional) The processes that produce output files which can be used as inputs for this new process. These are also known as the "parent" processes.
- Output Processes: (Optional) The processes that consume input files that come from this new process. These are also known as the "child" processes.
- Pipeline supports multiple input datasets: Check the box if the process is set up to handle users selecting more than one dataset to run through the analysis together and produce a single result.
- Pipeline supports Cirro sample sheet: Check the box if the process is set up to use the Cirro sample sheet. This is the recommended behavior for most pipelines as it allows the user to select samples, along with metadata, rather than individual files. See Preprocess Script for more information on how to read the sample sheet.
Define which projects will have access to use your pipeline using the "Project Visibility" section. Any user with Contributor-level permissions for an allowed project will be able to execute the workflow.
- Available to All Projects: (Only available with requisite permissions) Allow pipeline to be available for all projects across you organization.
- Available to Projects: (Optional) Select all Cirro project(s) that will have access to view and run this pipeline.
If the process type is not "Ingest", you will also need to fill out the following section about the repository that contains the pipeline's configuration files:
- Configuration Repository Name: The GitHub repository which contains the pipeline configuration files, including process-form.json, process-input.json, and process-output.json. It can also contain preprocess.py and process-compute.config where applicable. (e.g.
organization/repository). - Configuration Repository Type: If the repository with the pipeline code is private or public.
- Configuration Repository Version: The branch, tag, or commit hash of the GitHub repository which contains the version of the configuration to be used.
- Configuration Repository Folder: The folder, often named
.cirro, which contains the configuration files for the workflow. If the files live in the top of the repository, leave this section blank. - Pipeline code is in a separate repository: Check this box if the repository that contains the pipeline definition and configuration files, named above, does not also contain the pipeline code. If checked, the options below will become available.
If the pipeline code is flagged as being in another repository, you will also need to fill out the following section on the repository with the pipeline code:
- Pipeline Repository Name: The GitHub repository which contains the code for the pipeline itself. (e.g.
organization/repository). - Pipeline Repository Type: If the repository with the pipeline code is private or public.
- Pipeline Repository Version: The branch, tag, or commit hash of the repository which contains the version of the pipeline that should be used.
No matter the location of the pipeline code, please also provide:
- Pipeline Entrypoint File: The file which will be run by the chosen workflow executor, like
main.nformain.wdl. See Relative Imports in WDL for more information on WDL-specific behavior.
*Note: When adding repository paths, do not include the
https://github.cominhttps://github.com/organization/repository-- justorganization/repository. If you repository is private, please make sure our GitHub app is installed so we can read your repository. At this time, only repositories hosted on GitHub are supported.
You will have the option to define any "Expected Files". For ingest processes, these are the files users are expected to upload. For nextflow or cromwell processes, these are the files output from the pipelines. Defining these files allows Cirro to parse sample information out from the file names using Cirro's auto-population feature and save out individual samples. For ingest processes, users will be able to override the file name requirements by using a samplesheet.
- Add New File Type*: (Optional) Click the button to add information about the files that will be generated by this process. You can add as many expected file types as you require.
- File Type Description: The description of the file type, which is visible to the user. (Example:
Unaligned BAMs) - Minimum Files Expected: The minimum number of files required for this file type. If the file type is optional, set this value to 0.
- Maximum Files Expected (Optional) The maximum number of files that can be uploaded for this file type. If there is no maximum, you can leave this blank.
- Regex Pattern: Define the regular expression (or regex) pattern of file name that is expected to be uploaded. Be careful to use regex and not glob, as they are often mistaken for each other. Optionally, if you need to capture certain information from the file name and save it as file-level metadata in Cirro, you can use the table below for the most common capture patterns. (Example: If you have a file that starts with the sample name and then ends either in .fq.gz or .fastq.gz, the appropriate regex would be
(?<sampleName>[\S ]*).(fq|fastq).gz). Use our Developer Tools or Pythex to test your regex patterns.
| Variable | Regex Patterns | Explanation |
|---|---|---|
| SampleName | (?<sampleName>[\S ]*) |
The variable "sampleName" will be set to the characters (including whitespace) present at the specified location in the string. |
| ReadType | (?<readType>R\|I) |
The variable "readType" will be set to be either R or I if one of those values is present at the specified location in the string. |
| Read | (?<read>1\|2\|3) |
The variable "read" will be set to either the value of 1, 2, or 3 if one of those values is present at the specified location in the string. (You may add whatever numbers you expect, separated by the | character.) |
- Add Alternative Pattern: Click the button to add more allowed options for how the input file names can be formatted for the same file type. These file patterns are combined with the OR operator, so any of them may be used by the user for the same result. You can add as many expected file name patterns to your file type as you require.
Updating a Custom Pipeline
After a pipeline has been added, it can be modified in terms of both user access and configuration.
Clicking on the row in the table for a single custom pipeline will open a pop up with information on the pipeline including the repository it was loaded from and the exact code commit used.
To update the pipeline configuration in Cirro to reflect the newest code available in that GitHub repository, click on the "Sync Pipeline" button.
Note: Any changes made to the GitHub repository containing the pipeline configuration files will not be applied in Cirro until the "Sync Pipeline" button is clicked. Only the pipeline author can sync with the source repository. Changes to the pipeline code will be reflected in whatever the version is set to in the pipeline configuration.

You can also use the "Edit Pipeline" button to view and update all the options listed above. This includes the list of projects in which the pipeline can be run, which is under the "Project Visibility" options.
Technical Notes
Pipeline Configurations vs. Workflow Code
Keep in mind the difference between the pipeline configuration and the workflow code which is run using that pipeline.
If a pipeline configuration specifies that the latest version of a repository should be used, then the most up-to-date version of the repository will be executed every single time. However, if the configuration files for the pipeline are altered in any way (even in the same repository), that change will only take effect when "Sync Pipeline" is run again.
Relative Imports in WDL
When using workflows which are part of a larger codebase (such as GATK), it is common to reference an entrypoint found in a subdirectory
(e.g. cnv_wdl/somatic/workflow.wdl).
This behavior is fully supported in Cirro, such that relative imports
(e.g. import "../cnv_common_tasks.wdl) behave as intended.
Private Repositories
When using a private repository for either the Configuration or Pipeline Code, you must authorize Cirro to access the repository contents. When you receive the authorization warning, press "Connect to GitHub" and follow the authorization steps.

You will be prompted to allow the Cirro GitHub app to act on behalf of your GitHub user. Press "Authorize". If you've already authorized, this step will be skipped.
Note that the effective permissions of Cirro are only tied to the repositories that you allow. It doesn't allow access to all repositories (unless you specify that). You can read more about this by clicking the learn more link.
Once authorized, it will redirect back to Cirro. If you haven't installed the application, it will display a warning asking you to install the application.
By installing this app, you are granting permission for Cirro to run the code contained in it, but it will not be copied permanently to any storage system beyond the ephemeral instance used to execute the pipeline.

Click "Manage GitHub App". Press "Install" or "Configure" at the top right, and make sure Cirro has permission to your repository.
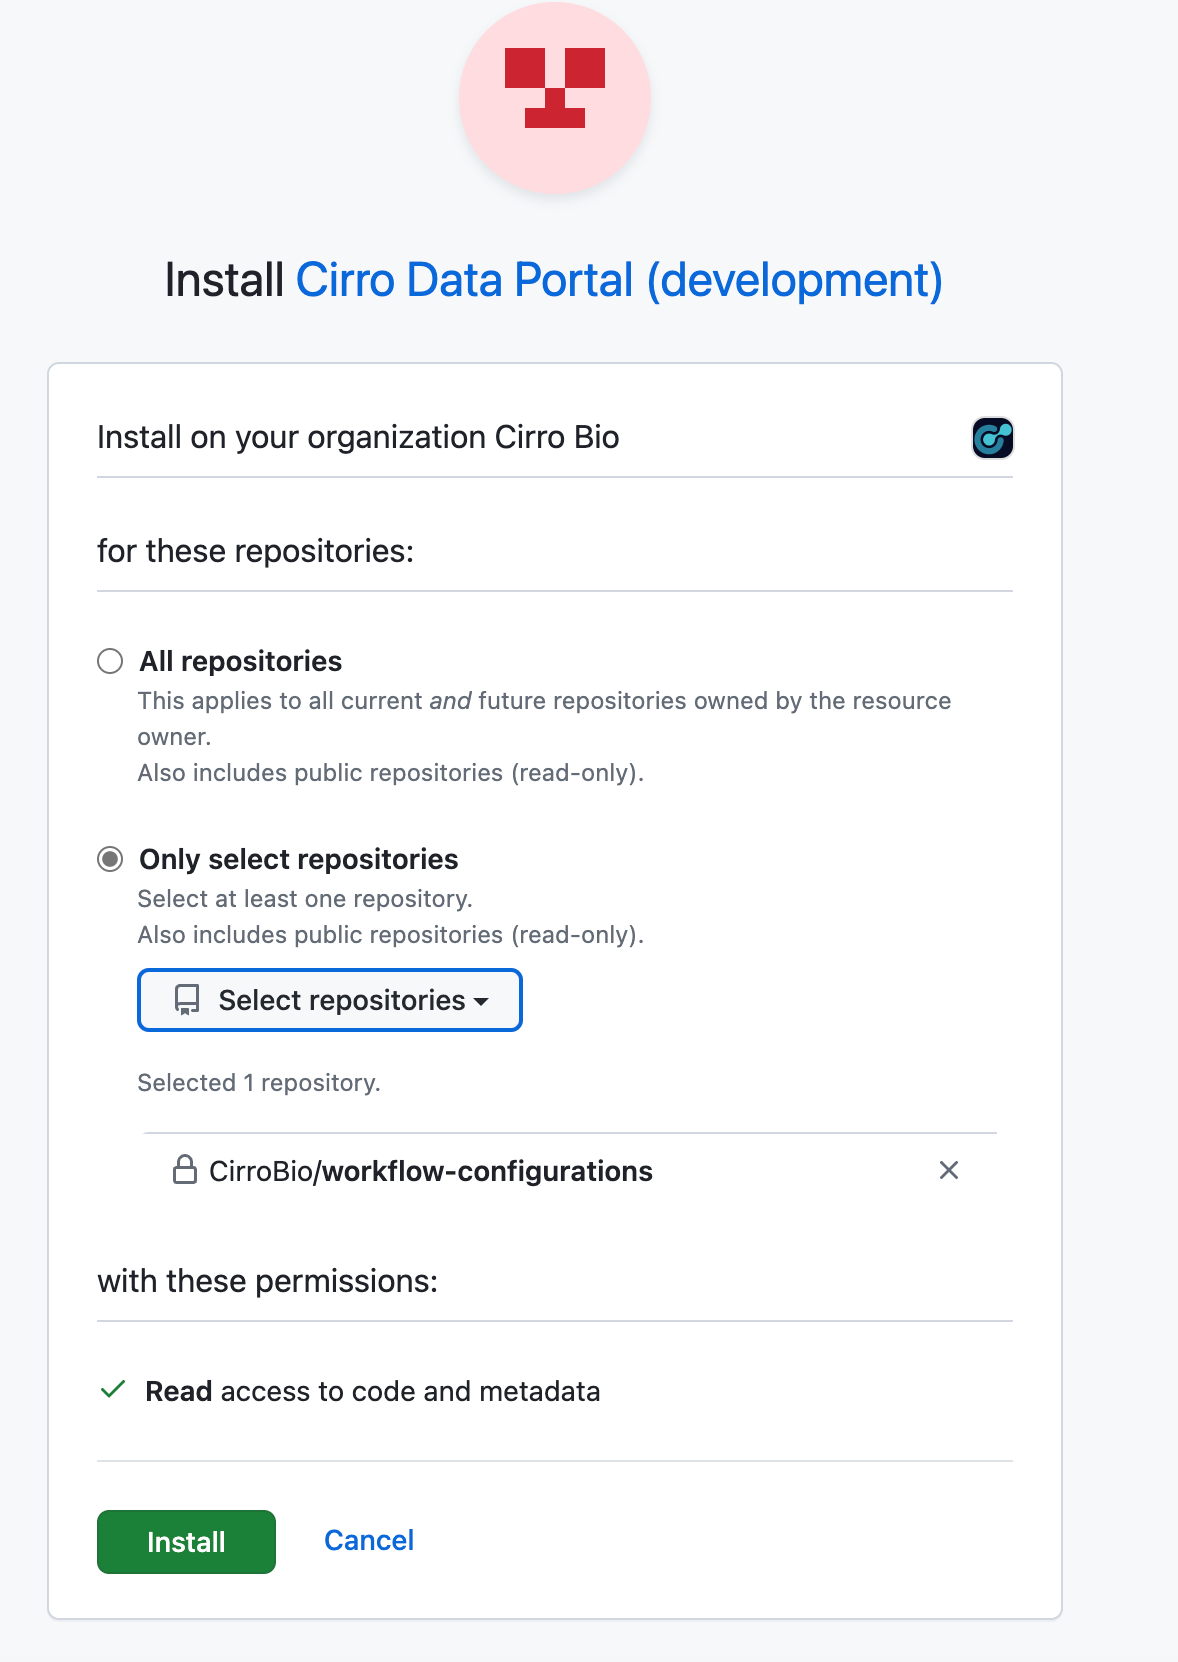
Once installed, go back to Cirro, and try the "Connect to GitHub" process again. If everything is set up, it will remove the warning message once it redirects back to the pipeline.
If you are connecting to a repository that is owned by an organization, you might have to get administrator approval to authorize the connection.
Note: While private repositories prevent the general public from viewing the code, you should assume that Cirro users that are able to run the pipeline can also see the pipeline's source code. This is due to the fact that users may have access to the underlying compute resources that run the pipeline code.