Projects
In Cirro, projects act as top-level containers of information. They will contain things like datasets, references, samples, and notebooks that all live under the large umbrella of a project.
Each project is linked to a single billing account, which is a good way to think about how to define the scope of a project. Each project also has its own set of users and permissions so data access controls can be easily maintained.
Requesting a Project
In most cases, projects must be requested and will be approved and created either by your Cirro organization's administrators, or by the Cirro team. To request a new project, go to the sidebar and select the Projects page. At the top of this page, click the "Request A New Project" button.

This button will bring up a pop up window for you to fill out the following information:
- Name: A unique name for your project.
- Description: A 1-2 sentence description of your project.
- Billing: (Optional) Provide information for how you would like to pay for costs incurred in the project (e.g. data storage and running pipelines). You may provide a budget number, purchase order, or another method. This will be used to set up a billing account for your project.
- Project Administration Contact Email: The email of the user you would like to be primary contact for the administrative needs for this project.
- Data Classification: Select which common classifications apply to your project's data. This will be used by your organization's administrators to understand what type of data you'll be uploading and if any governance requirements need to be applied.
- Message: (Optional) Use this space to provide any additional details or justification for your project.
Once the project has been approved and created, you will see it on the Projects page. From there, you can click on it to go to the project's Overview page, and then navigate to define your users and start adding datasets, samples, and references.
Creating a Project
If you are using Cirro under the "Independent Researcher" organization, you may have permission to create your own project. Look for the "Create Project" button at the top of the page, and fill out the following information.
- Project Name: A unique name for your project.
- Project Description: (Optional) A 1-2 sentence description of your project.
- Contact Name: The name of the person that will be contacted with any issues about that project.
- Contact Email: The email of your contact person.
- Contact Organization: The name of the organization associated with your contact person.
- Contact Phone: (Optional) The phone number of your contact person.
- Billing Account: Select the billing account you want to charge for costs incurred in the project (e.g. data storage and running pipelines).
- Budget Amount: When the project's total cost for the selected billing period (e.g. per month, per quarter, per year) approaches this amount, the project's contact person will receive emails. When this amount is reached, any pipelines and notebooks will be cut off and the data files will be saved.
- Budget Period: The time period you want associated with your budget amount. This can be monthly, quarterly, or annually.
- Allow users in your Cirro organization to search for your project: Check to allow users who are part of your greater Cirro organization, but not part of your project, to view your project name in order to send an access request or send a dataset share.
- Allow datasets in this project to be shared: Check to allow project admins to share datasets in your project with other projects. All projects can accept shares from other projects regardless of this setting.
- Service Connections: Which of your organization's shared services are connected to this project.
- Deleted Dataset Retention: The number of days to keep deleted datasets before being permanently erased.
- Temporary Storage Lifetime (days): The number of days to keep temporary storage space (e.g. workflow executor cache) before being erased. The default for new projects is 14 days.
- Maximum number of vCPUs for Spot Instances: The maximum number of compute cores you can launch at once for pipelines when you're doing batch processing. The nodes with these compute cores will not have GPUs available. 300 is a reasonable value for most projects, but if you want to run highly parallelized work you may want to add more. Feel free to contact the Cirro team with questions.
- Maximum number of vCPUs for GPU-enabled Instances: The maximum number of compute cores you can launch at once using nodes which also have GPUs available. The default for new projects is set to 0. Note that increasing this value for the first time in a project may take 1-2 business days as AWS reviews the required quota increase request.
- Maximum number of vCPUs for FPGA-enabled Instances: The maximum number of compute cores you can launch at once for Field-Programmable Gate Array (FPGA) enabled instances. The default value for new projects is 0.
- Account Type: Whether the AWS account connected to this project is created and hosted by Cirro or if Cirro uses a separate, pre-existing AWS account. This decision cannot be changed once the project is created. View our installation guide if you decide to use your own AWS account.
- Data Classification: Select any pre-defined data classifications that apply to the project's data, which can then be used to set governance requirements. Only organization admins are able to edit these classifications.
Once the project is created, you can click your project to go into the project's Overview page, and from there define your users and start adding datasets, samples, and references.
Finding a Project
To quickly find an existing project, use the "Search" option at the top of the Projects page to search for project names, descriptions, and tags. You can also look at the project tags which are visible next to the project's name in the list of projects.
Requesting Access to a Project
If you do not see the project you are looking for on this page, it means you do not currently have access to view it. If you believe you require access to a project, click the "Request Project Access" button at the top of the Projects page to open a pop up with the following fields:
- Project: Choose the project you would like to request access for. If the project you're are looking for is not listed, please contact the project administrators directly or email your organization's Cirro contact.
- Message: (Optional) Include a message to the project administrators.
Submitting this request will send an email to all the project's administrators. You will also get a confirmation email with the names of these admins in case you need to follow up. Once an administrator responds to your request, you will receive another email telling you whether you were approved or denied.
Granting Access to a Project
When a Cirro user requests access to a project, all the users with administrator permissions for the project will receive an email with a link to approve or deny the request. The link will take you to a unique page for this user's access request, where you can either assign the user a permission role and accept their request to join the project, or deny them access. The user and the rest of the project admins will receive a confirmation email of the response.
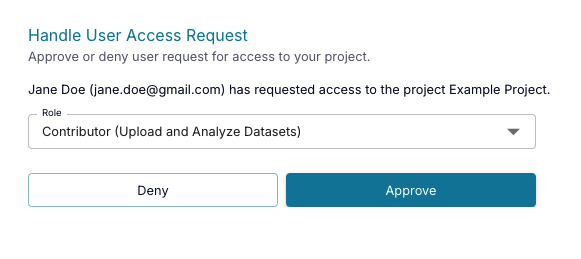
Administrators can also go to Projects page and click the Manage Requests" button at the top of the page to view a table with all project requests across all the project's they are administrator of.
If the user's request is accepted, they will appear on the Users page where their permissions can be updated at any time.
Project Governance
Governing access to data can protect organizations by ensuring all users are in compliance with anything from government regulations to internal best practices. Organizational and project administrators can upload documents, assign agreements and trainings to project users, and require completion before allowing access to project data in order to ensure compliance. Governance requirements are applied by organization admins based on the project's data classifications and by project adminstrators.
Cirro's governance feature must be enabled at the organization level. Organization admins can contact the Cirro team to discuss using this feature.
Types of Governance
Cirro currently supports three types of governance requirement: Agreements, Documents, and Trainings.
 Agreements: Files that all project users are required to read and agree to before accessing a project (e.g. a Data Sharing Agreement).
  Documents: Files that apply to a project without any user interaction (e.g. a Participant Consent Form)
  Trainings: Collections of files and links that often point to trainings on external websites, which must be completed before accessing a project (e.g. HIPAA training).
Configuring Requirements
Sometimes, organization administrators will create agreement and document governance requirements where the actual document needs to be uploaded at the project level. For example, an organization might need to require all its projects have a data sharing agreement, but the contents of that agreement might vary project to project and so it should be left up to the project administrators to upload the correct file.
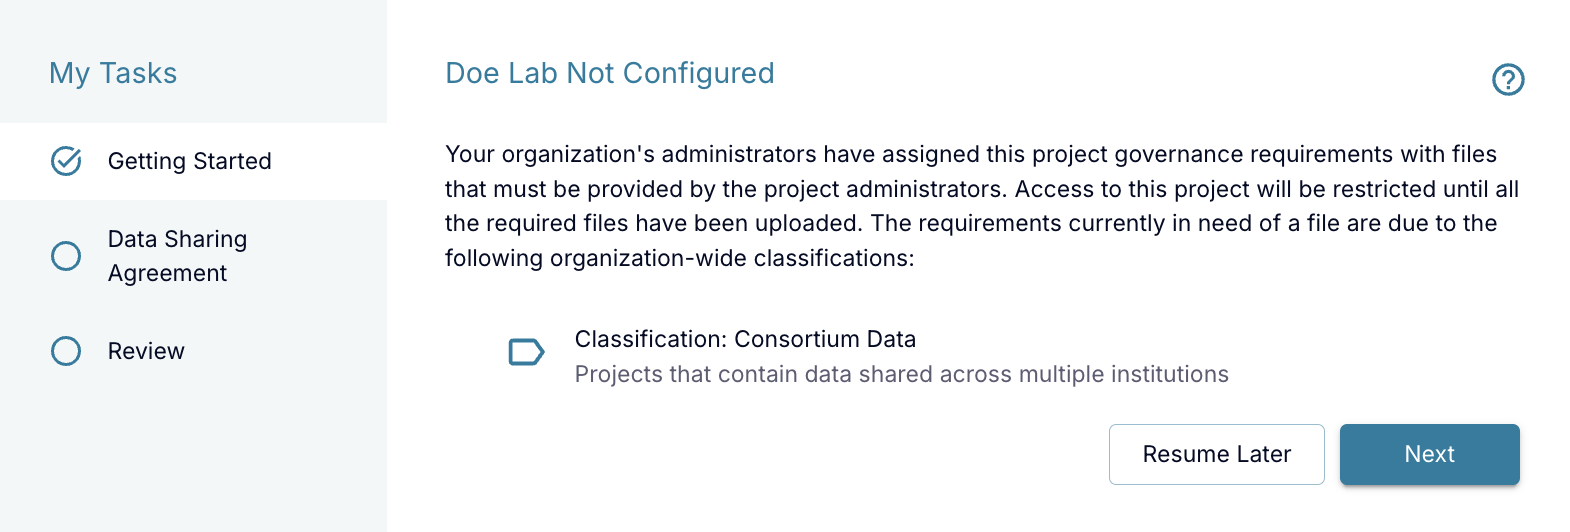
If the requirement is created by the organization administrator in advance of it's enactment date, project administrators can configure these requirements ahead of time in the governance widget on the project's Overview page under the "Action Required" heading. However, if the requirement becomes enacted before a file can be uploaded by project admins, access to the project will be restricted until the file is uploaded.
In this case, project admins will see the following pop up blocking their access to the project. On the pop up's "Getting Started" tab, they will see a list of the data classifications applied to their project which are triggering any requirements. A list of all the requirements that will need files is listed in the sidebar. They can click through the requirements in the sidebar, use any contacts, links, and files present to create and upload a file, and click "Submit" to officially configure a requirement. Once the requirements are configured, project admins will then need to complete the requirements.
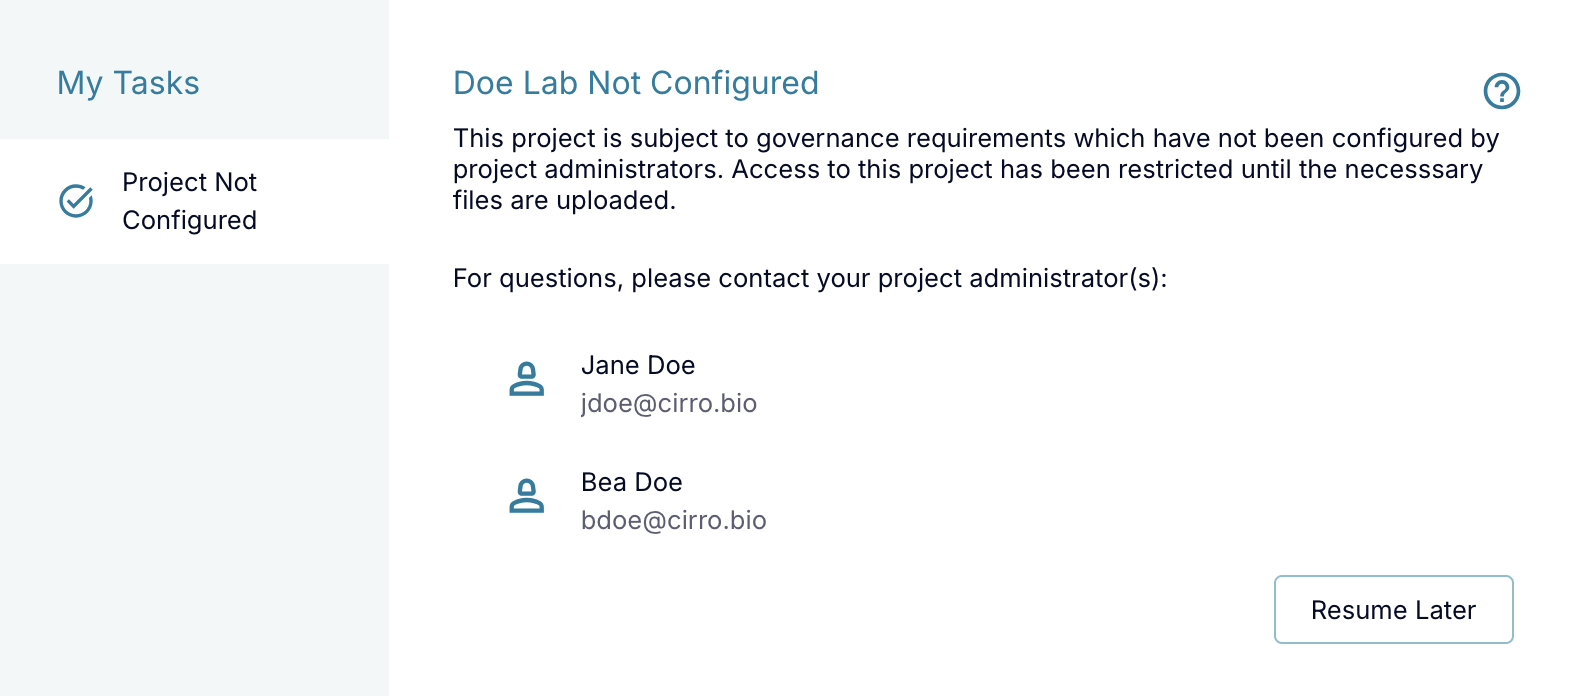
For project users who are not administrators, they will not be able to access the project until they can complete the enacted requirements, which means they must wait until their project administrators configure these requirements. They can reach out to their project admins with any questions using the information in the pop up. Once the requirements are configured, users will be allowed to complete the requirements.
Completing Requirements
Once a governance requirement is assigned to a project and enacted, that requirement will immediately be assigned to all the users, and access to the project will be restricted until a user meets the requirement. When entering a project that has been restricted by a governance requirement, you will see a "Terms of Use" pop up.
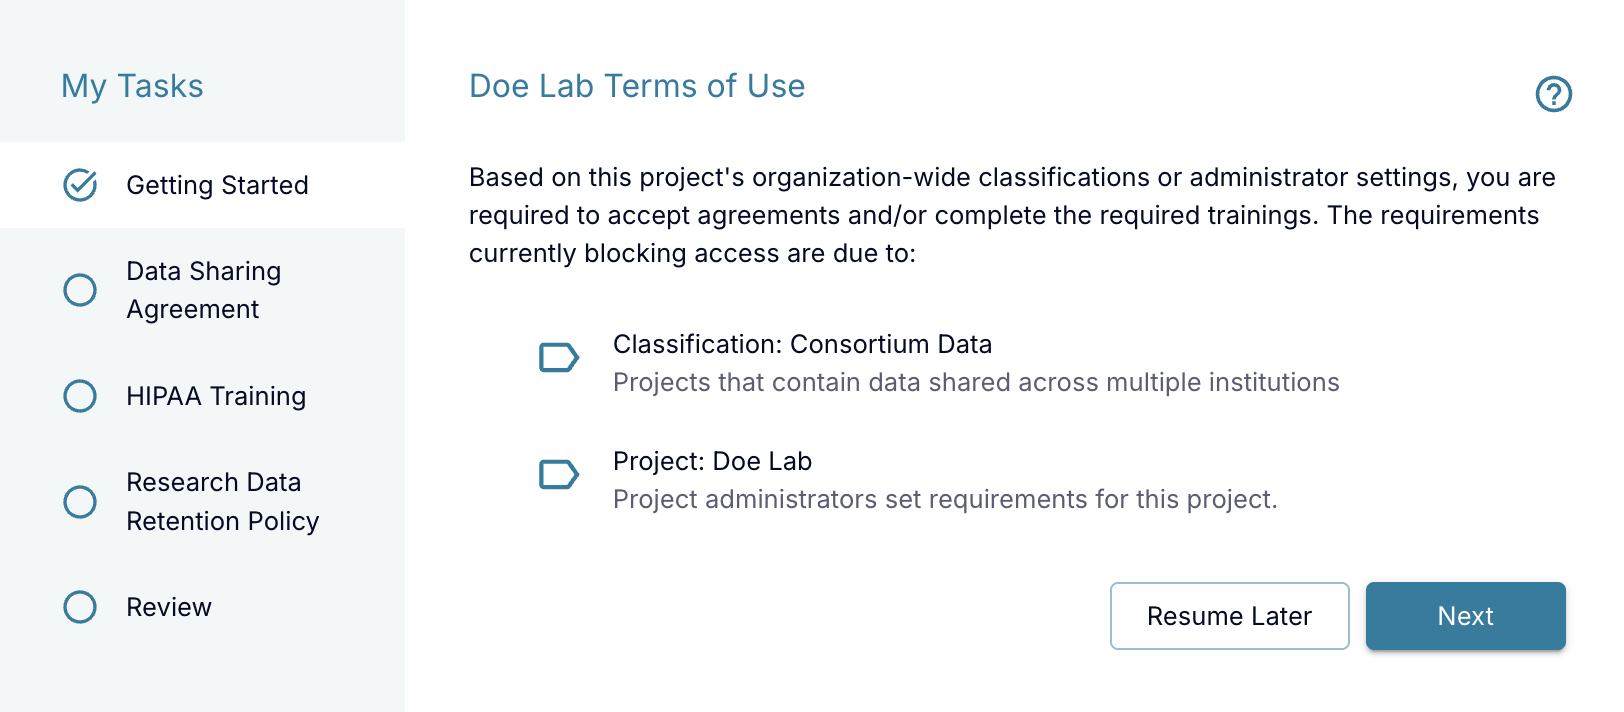
This pop up will explain the governance requirements that need to be met before you can access the project. On the pop up's "Getting Started" tab, you will see a list of any data classifications applied to your project, or if there are any settings by your project administrators, which are triggering these requirements. A list of all the requirements that will need to be completed before the user is able to view the project is listed in the sidebar. Click through the requirements in the sidebar and click "Submit" to officially complete a requirement.
Agreements are available to read directly in Cirro and will require users check a box to attest that they have read the file. The agreement may be set up by your organization administrator to require completion by every project individually, or they may choose to allow you to complete the agreement once and have it apply to all your projects.
Trainings are available through buttons with links to websites or documents uploaded by your organization. You will be asked to either check a box to attest that you've completed the training or upload a certificate. You will also be asked to give the date you completed the training, which could be today or a previous date if you'd already completed the training before seeing this pop up. Once you complete the training, it will be marked as completed for any and all of your projects that require it.
If you need to take a break while fulfilling these requirements, you can leave the page and come back later. Any requirements you've already fulfilled and submitted will be removed to retain your progress.
Viewing Completed Requirements
All completed requirements (along with documents which do not need to be completed) are visible on the project's Overview page under the Governance section.
Project admins can also view the completed requirements for all project users by going to the Users page, selecting a user in the table and clicking "Governance Summary" button.
Creating Requirements
Cirro's governance feature allows users with top-level, organization-wide administrative privileges to set up agreement, document, and training requirements for any of the organization's projects. These requirements can be added by visiting the respective pages in the System section of Cirro, and can then be applied to data classifications which can in turn be applied to projects.
Project administrators can also set these types of requirements for their specific project. These requirements can be added by visiting the Governance section of the project's Overview page.